Simple Random Items
For many games, Randomizing stats and abilities on items is an important and fun part of the game. Games such as Path of Exile, Diablo, Borderlands, Destiny, and many others. Arc Inventory supports creating randomized items, but setting up the gameplay elements to make it fun is a bit of effort. This tutorial will cover the basics of how to set up randomized items, weapon/armor slots, granting abilities, and putting items in the correct slots in the UI.
It is expected that you have a basic character setup, as outlined in the GAS Documentation. Also, a review of the high level concepts is recommended before launching into this tutorial. This Tutorial will also be in C++ and Blueprint.
Part 1: Setup the Inventory
In your player pawn, Implement the IArcInventoryInterface from "Interfaces/ArcInventoryInterface.h". Do so like this:
YourCharacter.h
UCLASS()
class YOUR_API AYourCharacter : public ACharacter, public IArcInventoryInterface /* ASC Interfaces here too */
{
    //Your character class stuff...

private:
    UPROPERTY(VisibleAnywhere, BlueprintReadOnly, Category = Camera, meta = (AllowPrivateAccess = "true"))
    class UArcInventoryComponent* InventoryComponent;
public:
    static FName InventoryComponentName;

    class UArcInventoryComponent* GetInventoryComponent() const override { return InventoryComponent; }
};
YourCharacter.cpp
    FName AYourCharacter::InventoryComponentName(TEXT("InventoryComponent"));

    AYourCharacter::AYourCharacter(const FObjectInitializer& ObjectInitializer)
        : Super(ObjectInitializer.SetDefaultSubobjectClass<UArcInventoryComponent_Active>(InventoryComponentName))
    {
        InventoryComponent = CreateDefaultSubobject<UArcInventoryComponent>(InventoryComponentName);

    }
Note
This setup, with the static FName InventoryComponentName and SetDefaultSubobjectClass allows you to have a bit of a heirarchy for your character classes. For example, you can have a base class that uses a basic inventory component and a 'PlayerCharacter' subclass that has an Active inventory component. It is up to you if you want to go this route.
Next, create a new Blueprint Class that is a child of AYourCharacter, named BP_YourCharacter. Verify that you have an Inventory Component on your character.
Attribute Set Setup
We now need to create some GAS types, an Attribute set and a pair of abilities. The Attribute Set will be modified by our items, and the abilities will be granted by them.
To get started, lets create an Attribute Set, which we will call AMyAttributeSet. Lets give it two attributes, Armor and Power, which we will modify by our randomized items. You will easily be able to create additional attributes for your game, but to keep this tutorial simple we are going to just make two.
In your editor project, go to File, then New C++ Class. Check "Show All Classes", and select Attribute Set as the parent class. Name it MyAttributeSet and hit Create Class. If it asks to edit the class, hit yes.
From here, we need to add in our C++ code for this attribute set. For this, we need to write a bit of boilerplate code, which you can find out more about in the GAS Documentation
MyAttributeSet.h
#pragma once

#include "CoreMinimal.h"
#include "AttributeSet.h"
#include "MyAttributeSet.generated.h"

UCLASS()
class UMyAttributeSet : public UAttributeSet
{
    GENERATED_BODY()
public:
    UMyAttributeSet(const FObjectInitializer& ObjectInitializer);

    virtual void GetLifetimeReplicatedProps(TArray<class FLifetimeProperty>& OutLifetimeProps) const override;

    UPROPERTY(Category = "Attributes", EditAnywhere, BlueprintReadOnly, ReplicatedUsing = OnRep_Power)
    float Power;

    UFUNCTION()
    virtual void OnRep_Power(float PreviousPower);

    UPROPERTY(Category = "Attributes", EditAnywhere, BlueprintReadOnly, ReplicatedUsing = OnRep_Armor)
    float Armor;
    UFUNCTION()
    virtual void OnRep_Armor(float PreviousArmor);

};
MyAttributeSet.cpp
#include "MyAttributeSet.h"
#include "Net/UnrealNetwork.h"
#include "AbilitySystemComponent.h"

UMyAttributeSet::UMyAttributeSet(const FObjectInitializer& ObjectInitializer)
    : Super(ObjectInitializer)
{
    Armor = 30;
    Power = 100;
}

void UMyAttributeSet::GetLifetimeReplicatedProps(TArray<class FLifetimeProperty>& OutLifetimeProps) const
{
    Super::GetLifetimeReplicatedProps(OutLifetimeProps);

    DOREPLIFETIME_CONDITION_NOTIFY(UMyAttributeSet, Power, COND_None, REPNOTIFY_Always);
    DOREPLIFETIME_CONDITION_NOTIFY(UMyAttributeSet, Armor, COND_None, REPNOTIFY_Always);
}

void UMyAttributeSet::OnRep_Power(float PreviousPower)
{
    GAMEPLAYATTRIBUTE_REPNOTIFY(UMyAttributeSet, Power, PreviousPower);
}

void UMyAttributeSet::OnRep_Armor(float PreviousArmor)
{
    GAMEPLAYATTRIBUTE_REPNOTIFY(UMyAttributeSet, Armor, PreviousArmor);
}
Now that we've created this attribute set, let's add it to our character's Ability System Component. In our BP_YourCharacter, access the Ability System Component. Find the Default Starting Data property, and an add an element to that array. In the Attributes drop down, select our Attribute Set we just created. Leave Default Starting Table blank.
Simple Ability Setup
From there, we need a simple ability. For this tutorial, we are just going to create a simple ability that prints out our attributes. This ability can do whatever we want, but creating gameplay mechanics is a bit outside the scope of this tutorial.
In your content browser, right click, select Gameplay and chose New Gameplay Ability Blueprint. Select Gameplay Ability from the Parent Classes dialog, and name this ability BP_PrintAttributes_GPA.
This ability will be simple. We are going to get the value of the Armor and Power attributes, and then when we activate our ability it will print the values to the screen.
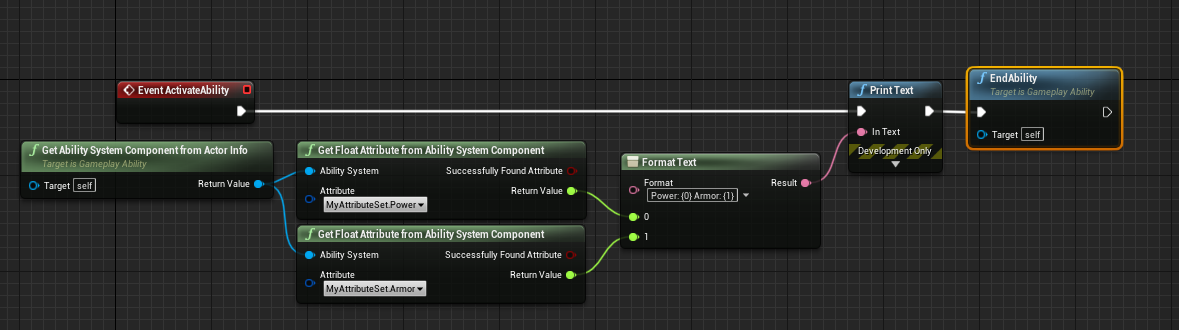
Once we have this ability set up, save it and compile.
Randomized Items
Arc Inventory was originally designed to support randomized items, and accomplishes this through the use of Sub Item Stacks on a given item, and an Item Generator to produce the Item Stack.
In this tutorial, we are going to take advantage of some of the example randomization code provided in the plugin, but we will go into some detail about the structure and how to create your own classes or modify them for your game.
To create a randomized item, we need to have an Item Generator that can support randomization. For most games, Item Generation produces a rather simple item stack, but for randomization, we need to produce not just an 'base' item stack for the item, we need to also create and attach the randomized properties for the item as well. In Arc Inventory, we have created a "Simple Random" item generator that uses a weight-based randomization algorithm to select the randomized properties to give to an item.
However, we are going to create our own simple randomizer that will select one random property from a list and add it to our item stack as a perk.
So, lets get started creating a Item Generator. Just like the attribute set, let's create a new C++ class for MyItemGenerator. In the Create New C++ Class dialog, view all classes and select ArcItemGenerator as the base class.
In the Header, we need to override the GenerateItemStack_Implementation function, the base item definition, and create an array of attribute modifiers. We will use the Arc Inventory provided FArcPerkModifierData type, which allows us to select and modify a gameplay attribute. The Item Generator will select a random Modifier and add it to the the item we are creating.
MyItemGenerator.h
#pragma once

#include "CoreMinimal.h"
#include "Generators/ArcItemGenerator.h"
#include "Perks/ArcItemPerkTypes.h"
#include "MyItemGenerator.generated.h"

/**
 *
 */
UCLASS()
class ARCINVENTORYEXAMPLE_API UMyItemGenerator : public UArcItemGenerator
{
    GENERATED_BODY()
public:

    virtual UArcItemStack* GenerateItemStack_Implementation(const FArcItemGeneratorContext& Context) override;

    //The base item definition that we will be randomizing
    UPROPERTY(EditAnywhere, BlueprintReadOnly, Category = "Definition")
    TSubclassOf<UArcItemDefinition_New> ItemDefinition;

    UPROPERTY(EditDefaultsOnly, Category="Randomization")
    TArray<FArcPerkModifierData> PossibleModifiers;

};
Let's implement GenerateItemStack_Implementation now.
The first thing we want to do is generate the base item as normal. To do that, we simply need to call CreateNewItemStack with the Item Definition we are creating.
UArcItemStack* UMyItemGenerator::GenerateItemStack_Implementation(const FArcItemGeneratorContext& Context)
{
    UArcItemStack* BaseItem = CreateNewItemStack(ItemDefinition, nullptr);

    //Randomize the Item

    return BaseItem;
}
Note
We aren't using Rarities in this tutorial, so the second parameter of CreateNewItemStack will always be nullptr.
Now, we need to randomize the item. Again, for this tutorial, we are just going to select one randomization and apply it to our item here. Let's select a random element from the randomization array, and create a new item from it. We will be using the built in 'Perk' item stacks.
UArcItemStack* UMyItemGenerator::GenerateItemStack_Implementation(const FArcItemGeneratorContext& Context)
{
    UArcItemStack* BaseItem = CreateNewItemStack(ItemDefinition, nullptr);

    //Select a random perk
    int32 index = FMath::RandHelper(PossibleModifiers.Num());

    FArcPerkModifierData RandomModifer = PossibleModifiers[index]; //Copy this modifier out of the possibles

    RandomModifer.Value = FMath::RandRange(1, 50); //Create a random value for this modifier

    UClass* PrevISC = ItemStackClass;
    ItemStackClass = UArcItemStack_Perk::StaticClass();

    if (UArcItemStack_Perk* NewPerk = Cast<UArcItemStack_Perk>(CreateNewItemStack(UArcItemDefinition_Perk::StaticClass(), nullptr)))
    {
        NewPerk->Modifiers.Add(RandomModifer); //Add the modifier to the perk
        //Add the random perk to the base item
        BaseItem->AddSubItemStack(NewPerk);
    }
    ItemStackClass = PrevISC;

    return BaseItem;
}
Note
Normally, you would have a custom Item Generator for perks here. Because this is a simple tutorial with only one item generator, we need to set the ItemStackClass before calling CreateNewItemStack. If you want to use the multiple item generator strategy, you can see it in ArcItemGenerator_SimpleRandom.cpp
Now, we have an Item Generator that is capable of generating a randomized item.
Inventory setup and Item Creation
Note
This section is taken from the Simple FPS tutorial. If you've done that tutorial already, you can skip this part
Inventory Layout
Arc Inventory makes a very clear distinction between underlying data and the visual representation of that data. This allows for seperation of work for larger teams, but also for quick iteration of doing temp UI to get design down.
We'll start with adding item slots. Our goal will be to create an inventory layout similar to the screenshot on the marketplace for Arc Inventory. For that, we have the following:
- Primary Weapon
- Secondary Weapon
- Head Armor
- Body Armor
- Passive Slot 1
- Passive Slot 2
- N Bag slots
The Primary Weapon and Secondary Weapon slots can hold Active Items (IE: weapons that can be held in the character's hand), and for the sake of this tutorial, we'll say that only Pistols can go in the Secondary Weapon slot and any active items can go into primary. Head and Body armor require items that fit directly in that slot, but Passives can hold any passive item except Head and Body armor. N Bag Slots means that you have any number (lets say 12) slots that can hold any item, but if the item is in that bag slot it does nothing.
Open BP_Character and navigate to the Inventory Component on it. There, you will see 'Bag Slot Count'. Set that to 12 (Note, you can bind it to a GameplayAttribute, and the bag will resize as that attribute changes). This gives us N Bag Slots.
From there, in the Inventory Layout section, Create 6 array elements. These will be our custom slots.
In slot 0, we want to have a primary weapon. So, in the Tags, Give the slot the Active item tag and the Equipment tag (Ensure you set these in the Arc Inventory settings in the project settings). This will denote this slot as both an Active and Equipment slot, and those behaviors will activate when an item is placed into this slot. We also want to indicate that this is the 'Primary Weapon' slot, so create a new tag Inventory.Slot.PrimaryWeapon and give it to this slot.
In this slot's filter, we want to create Filter Query that accepts ANY(Inventory.ItemType.Weapon), and check 'Force Single Stack'. This will cause the Inventory to check if any item attempting to be placed into this slot contains the Inventory.ItemType.Weapon tag, and it will only accept items with 1 stack. We'll set the items up later.
Secondary Weapon is similar to Primary weapon. Give it the Active and Equiment tags, and create a tag named Inventory.Slot.SecondaryWeapon and grant it. In the filter, create a query that checks for the Inventory.ItemType.Weapon.Pistol tag to ensure that only pistols can be placed in this slot.
For Head and Body Armor, we want to set the Tags to be have the Equipment Tag, and a tag for it's name (ie Inventory.Slot.HeadArmor). In the Filter, Ensure that the query is looking for ANY(Inventory.ItemType.Passive.Head) and Body respectively. We also want to force single stack.
The passive slots are similar, however they do not need unique tags to identify them. Give them the Equipment Tag, and give them both the Inventory.Slot.Passive tag, and ensure that their filters only allow passive items (perhaps ANY(Inventory.ItemType.Passive) AND NOT(Inventory.ItemType.Passive.Head OR Inventory.ItemType.Passive.Body)) Slots do not need unique tags, and since any valid item can be placed in either slot. If we wish to find specific items later in code, we can query for different information.
With this, the data is set up for this inventory layout. Now lets create a few items to put into these slots
Creating Some Items
Weapons
Create a new Blueprint Class that inherits from UArcItemDefinition_Active. Active Item Definitions are item definitions that denote items that can be held in a player's hand. Active Items can be placed into any slot, but they only can become active if placed in a slot with the Active Item tag, and the player makes that item active (usually through swapping to that item).
In the Owned Tags variable, set the containter to have Inventory.ItemType.Weapon.Rifle, and any other tags you wish to describe this weapon. I have seen setups with 10+ tags to describe each weapon, and there is very little cost to having many tags on a weapon.
In Active Item Ability Info, Set up the Active Ability Entry, by giving it an ability and bind it to input. See GAS Documentation for methods for doing input. Add any Attribute Sets you want to this item as well, and any tags that are granted to the player. Anything defined and set up in Active Item Ability Info is only applied to the character when the item is held in the character's hand.
Once you are happy with this item, Duplicate this item and change it's Owned Tag to have Inventory.ItemType.Weapon.Pistol. This will go in the secondary slot.
Equipment
Similar to weapons we want to create some new blueprint classes here. Unlike weapons, we want to create these based on UArcItemDefinition_Equipment. While Active items inherit from Equipment (and have many of the same properties), by inheriting from Equipment you cannot make these items active if they are in an active item slot, and thus cannot be held in hand.
In our Owned Tags, we want to give our equipment some tags to describe the item. we created a few tags when we created the item slots, so make sure you use those tags to describe head and body armor.
In the Equipped Item Ability Info, give these Head and Body armor pieces an 'Added Gameplay Effects' entry and give them a gameplay effect that is applied to the character when these items are placed into a slot with the Equipment tag. This is done automatically.
Generating Items
Now that we have some items and an item generator for them, now we must put these two parts together to create items. In the editor, create a new blueprint based on MyItemGenerator. We will need to create an Item Generator for each type of item we are making, so expect to make a few of these. For this tutorial though, we will create one and leave the rest as an exercise for the user.
In the first Generator, we will give it the Rifle as our base item type. We'll also create two modifiers, one for Power and the other for Armor.
In the Item Definition property, set it to your first item Definition. In the Possible Modifiers property, create two array elements, setting the first to MyAttributeSet.Power and the econd to MyAttributeSet.Armor. Leave both of them as the Add op and the Value to 0.0 and slot application to an empty query (we will not be using this).
Note
In the item definition for the item you are using as the base item, ensure that the "Print Ability" ability is the active item bound to input.
Now, in our character's starting item generators, we will use this item generator to produce an item. Set the starting item generator to use your this BP_MyRandomGenerator, and when the game starts up you will have a randomized item. If you activate the print ability, you will see that the properties have been randomly modified by the perk.
Note
Consult the example project for how to set up a character with starting item generators.
- Item Drops
- Pickup into inventory
Configuring the UI
- Item Slot Views
- Item Cards
- Perk Views